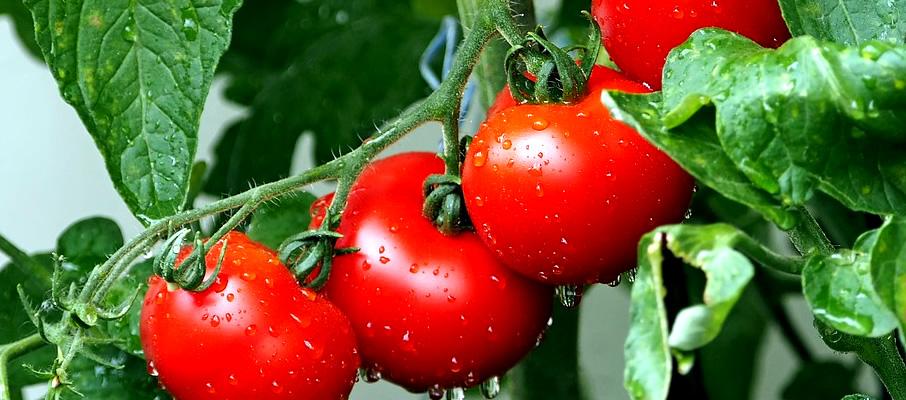
Tomatoes (Solanum lycopersicum)
Local names in Kenya (Nyanya; Tsinyanya)
Overview
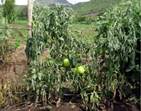
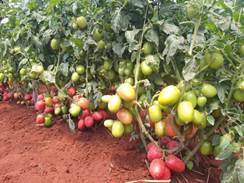
Tomato is one of the most widely cultivated vegetable crops in Kenya. In western Kenya it is mostly grown for home consumption in the backyard of homesteads. Tomato is consumed in diverse ways, raw or cooked, in many dishes, sauces, salad and drinks. Tomato yields in smallholder cropping systems in the region are generally far below the potential of the crop. There are several reasons for low yields. Among these are low quality seeds, non-availability of inputs, sub-optimum crop husbandry and a large number of pests and diseases.
Altitude range
Tomato require altitudes of 0 – 2000 masl
Soil type and conditions
Deep, well-drained fertile loams soil rich in organic matter. It requires a pH: 5.0 – 7.0, Zn, Mn and Fe become deficient and below 4.5, producing sour fruits. Tomato nutrient requirements include: N, P, K, Mg, Ca, S, Mn, Mo, Zn, Bo, Cu, Fe
Temperature range
The temperatures should be 18 – 29 oC
Rainfall
Rainfall of 600 mm is essential during production period
Prepare the main field 1-2 weeks before transplanting, to create good condition for field establishment
Steps during land preparation
- Prepare the main field 1-2 weeks before transplanting
- Plough and harrow to appropriate tilth
Apply manure and basic fertilizer according to soil analysis results and recommendations
Planting materials
Select planting materials from reliable sources/agro-vets that are early maturing, bushy, short stem and preferred in the market
Direct planting can be done or seedlings can be raised in a nursery by:
Constructing raised or sunken nursery beds at 1 m width by desired length
Incorporate 5 kg of well-decomposed compost or manure/m2 into the seedbed
Sterilize the nursery bed with hot water treatment, burning, solarization or application of appropriate pesticide
Sow seeds in the furrows 20cm spaced at 2.5cm and cover lightly with soil
Mulch and water regularly until the seedlings emerge
After emergence of seedlings remove the mulch from the beds and construct a raised shade (about 1 m)
Apply adequate water regularly to sustain good, healthy growth of the seedlings
Keep the nursery weed-free and scout for pests and diseases
Varieties include;
Fresh market; Money Make, Elgon Ndume, Marmande, Rio Grande,
Processing; Cal-J -Determinate, M-82, Roma VF, Bush tomato
Planting
Water the nursery to saturation point 12 hours before transplanting
Transplant seedlings at 3-4 weeks in the nursery. Transplanting should be done either in the early morning or late in the evening
Make furrows or planting holes depending on the spacing of the specific variety e.g. 100 cm x 50 cm; 75 cm x 50 cm; 70 cm x 45 cm; 60 cm x 45 cm.
Wider spacing of 100 cm x 50 cm is good
Target plant population density 37,000 to 9,300 plants per ha
Irrigate early in the morning to avoid late blight disease
Reduce watering at the end of crop maturity
Regular watering reduces blossom end rot, ensures uniform fruit development, prevents fruit splitting, reduces the risk of sun scorch, enhances fruit growth, and increases the size and number of fruits
Weeding is done through hoeing, mulching or use of herbicides
Do shallow cultivation not too close to the plant in order to prevent damage of the plants
Apply top-dressing fertilizer such as CAN in 2 splits at 100kg per ha (5g or ½ teaspoonful per plant) and 200kg per ha at 4 and 8 weeks, respectively, after transplanting
Stake if necessary depending on the varieties
Guide plant along the trellising string or wire
Put a 2m stick firmly in the ground for each tomato plant and tie the stems loosely as the plant grows
or
Put a stout pole in the ground at every 4m and 2 wires running one at 2m and another at 0.15m above the ground
Tie a strong string between the two wires behind each tomato plant
Twist the plants carefully around the strings as they grow
Start staking about two weeks after transplanting
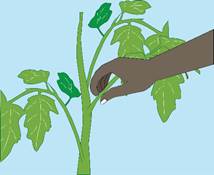
Pruning is done by removing the lower mature leaves and checking for the presence of pests and diseases
Pruning creates microclimate that improves air circulation within the canopy which reduces foliar diseases, facilitates harvesting and spraying
Pruningh leads to earlier maturity and encourages fruits to increase in size and uniformity
Pruning
Pests include;
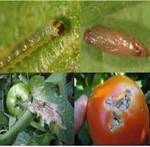
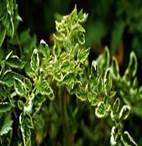
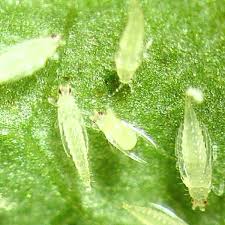
Tuta absoluta, African bollworm (Helicoverpa armigera), Red Spider mite (Tetranychus cinnabarinu, T. lomardin and T. telaryus), Whitefly (Bemisia tabaci), Root-knot nematode (Meloidogyne spp) and Thrips.
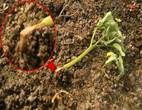
Tuta absoluta
Burnt leaves with irregular mines that have black deposits (frass)
Black cracks on the stem and holes on the fruit surface leading to tunnels in the fruit
Control of Tuta absoluta
Plant clean seedlings free from all stages of the moth
Rotate with non-host crops such as maize, beans and cabbages
Remove and destroy wild host plants such as Sodom apple around the farm
Remove and burn all infected crop residues
Remove infested leaves before the caterpillar inside pupates and becomes an egg-laying adult
Burying deep 50-100 cm infested fruits and foliage.
Clean all equipment used in transportation of tomatoes such as boxes, crates and trucks using soap and water
Use black sticky traps-24 pcs per acre, placed 15-20 cm above the ground
Use screen vents in roofs and on the sides of the greenhouse to reduce insect pest migration
Use of Bacillus thuringiensis controls outbreaks
Use sex pheromone traps on the males, thus reducing the populations due to reduced fertilization of the females
Pheromone lures can be used for monitoring and mass trapping
Spray using spinetoram (Radiant 120 SC(R)) at the rate of 18-30ml per 20 L of water
Spray using Chlorantraniliprol (Corragen 20 SC (R)) at the rate of 2ml per 20 L of water
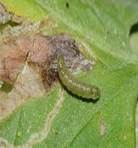
African bollworm
Adult moth is dull yellow to brown
The female moth is attracted to flowers where it lays between 750-1000 eggs
Eggs are tiny round and brownish and laid near or on flowers or small fruits
Eggs hatch after 2 to 4 days
Larvae have alternating light and dark colored stripes on either side of the body
The larval life lasts about 3 weeks
The pupa is shiny brown. Pupal period lasts 10 to 14 days

Control of African bollworm
Rotate with non-host crops such as maize, beans and cabbages
Remove and destroy wild host plants such as sodom apple around the farm
Remove and burn all infected crop residues
Remove infested leaves before the caterpillar inside pupates and becomes an egg-laying adult
Burying deep 50-100 cm of infested fruits and foliage
Use black sticky traps - 24 pcs/acre, placed 15-20 cm above the ground
Use screen vents in roofs and on the sides of the greenhouse to reduce insect pest migration
Spray using spinetoram (Radiant 120 SC (R)) at the rate of 18-30ml per 20 L of water
Others
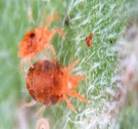
Red Spider mite

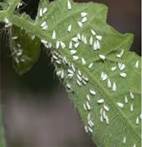
White fly
Root-knot nematode
Thrips
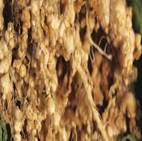
Major diseases include;
Damping off, bacterial wilt (Pseudomonas scalanacearum), Late blight (Phytophthora infestans) and blossom end rot (BER)
Damping off
Caused by several pathogens namely, Pythium spp Fusarium spp and Rhizoctonia solani
Control of Damping off
Use certified disease-free seed
Seed treatment with fungicide e.g. Apron Star®
Avoid siting seedbed near tomato field
Avoid excessive fertilization using nitrogen compounds
Solarization of seedbed
Thin seedlings in nursery bed to allow for good air circulation
Proper watering in nurseries
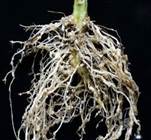
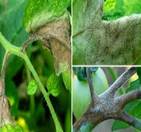
Bacterial wilt
Caused by Pseudomonas solanacearum. The disease causes wilt of tomatoes. It is seed-borne in tomatoes
Bacterial wilt effects the whole plant
Symptom first appear on the youngest leaves and a rapid wilt of the whole plant occurs
Adventitious roots appear on the infected stem.The vascular bundles will be yellowish brown in the initial stages of the disease
Control of bacterial wilt
Practice crop rotation, with non-susceptible crop
Tomatoes should not follow Solanaceous crops like potatoes and capsicums
Produce transplants in pathogen-free soil
Remove and burn infected plants as soon as possible to check the spread of the diseases
Plant resistant tomato cultivars
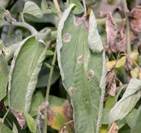
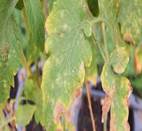
Late blight
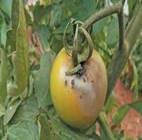
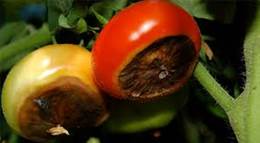
Blossom end rot
Physiological disorder due to calcium deficiency
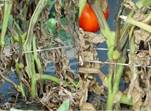
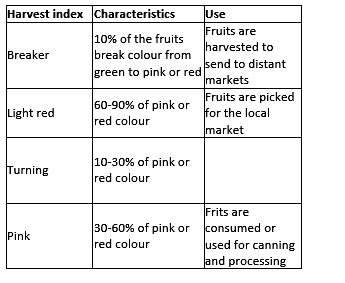
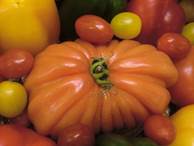
Four maturity stages are recognized for tomatoes, i.e. breaker, light red, turning and pink:

Tomato ripening stages
Harvesting is done by hand by twisting and turning until the fruits snap off the vine
Harvesting should preferably done early in the morning when temperatures are cool
Put the harvested fruits into holding containers (plastic buckets)
The harvested fruits are put in a cool place e.g. in a shade
Harvesting should be done early in the morning or late in the evening since this is when the plant is turgid
Tomato will produce 25-100 tons per ha with proper management
Maturity stage
Tomatoes are placed into plastic or wooden crates in the field until they are transported to the market
Transportation is done by pick-ups, lorries and motorbikes
Tomatoes are packed in environmentally friendly canvass bags 1-1.5kg for sale at retail level
Other retail units include plastic containers 2-5kg, traditional baskets 2-5kg and heaps 3-5 fruits
Tomatoes are marketed in the fresh produce markets, supermarkets, retail shops, hotels, restaurants, institutions and food processing factories
Sorting is done to remove rotten, damaged, cracked and diseased fruits, and debris. Sorting limits spread of infection to healthy fruits during post-harvest handling
Grading is categorization of fruits on the basis of color, size and stage of maturity / degree of ripening
Tomato;
Fruits

Juice