
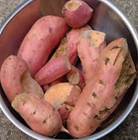
Sweet Potato (Ipomoea batatas)
Local names in Kenya (Viazi vitamu, Rabuon, Mabuoni, Amapuoni)
Overview
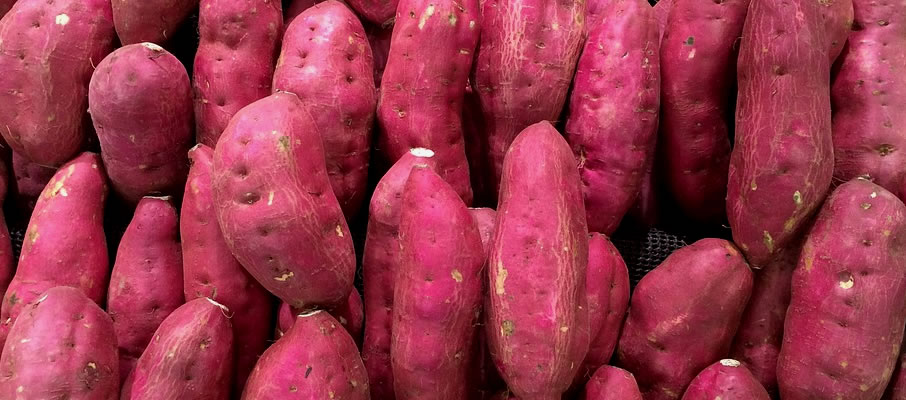
Sweet potato is a dicotyledonous herbaceous perennial vine. It has large, starchy, sweet tasting tuberous roots that are cooked and eaten as staple food. Its leaves can be used as vegetable. The edible tuberous roots are long and tapered with a smooth skin whose colour ranges between yellow, orange, red, brown and purple. It is widely grown in Kenya, mainly on a small scale for subsistence. The crop is currently gaining popularity again with changing tastes and preferences of consumers.
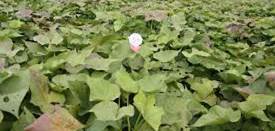
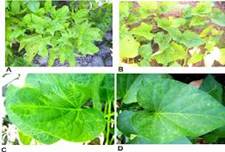
Sweet potato crop at vegetative stage
History
Sweet potato should not be planted in fields that had sweet potato or other tuber crops in the previous year to reduce risk of transfer of pests and diseases.
Altitude range
Sweet potato can be grown at altitudes from 0 – 2500 m above sea level, depending on variety, but it performs best in an altitude range of 1000 – 2100 m.a.s.l.
Soil type and conditions
Sweet potato requires a well-drained, deep, friable (loose) sandy loam to loamy clay soil. It does poorly in clay, stony, rocky or waterlogged soils. Optimum soil pH is between 4.5 and 7.0. Soils which are excessively acidic or alkaline encourage bacterial infection and negatively influence yield.
Temperature range
For optimal growth, day temperatures should range between 15 – 30°C.
Rainfall
The site should have an average annual rainfall of 750 mm – 1500 mm, with at least 500 mm during the growing season.
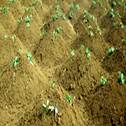
Steps during land preparation
- Ploughing can be done using hand hoe, ox-plough or tractor. Plough deep enough for root expansion.
- Harrowing may be necessary to ensure an appropriate tilth.
- In dry environment, sunken beds can be used for moisture retention
- Planting ridges can be constructed manually, or with an oxen or tractor drawn ridger. Ridges should be made along the contours to minimize runoff and reduce soil erosion. Recommended dimensions of the ridges are 30 - 45 cm high and 60 cm wide, and spaced 1.0 m apart.

Ridges Mounds
5. Planting mounds are recommended for flat areas that are infested with mole root rats, or in areas experiencing drainage problems. Planting mounds/heaps are spaced 60 - 100 cm apart and 30 - 60 cm high. They are prepared manually using a hoe (jembe).
(vines or cuttings) should be obtained from accredited nurseries/ institutions (like JKUAT, KALRO) to ensure that they are clean (disease-free).
To select good planting material, consider length, age, and health of planting material. Vine tips of old plants are weak and grow slowly, while vine tips of young plants are vigorous and grow rapidly. The length of cuttings/vines should be 25 - 40 cm long with at least 3 - 4 nodes.
Tips of old plants are weak and grow slowly, while vine tips of young plants are vigorous and grow rapidly. The length of cuttings/vines should be 25 - 40 cm long with at least 3 - 4 nodes.
Rapid vine/seed multiplication:
When quality planting material/seed is limited but required in large quantities, farmers can raise sufficient planting materials for timely planting at the onset of rains through
rapid vine/seed multiplication process.
Rapid vine multiplication can be done in a nursery, shed or under fleece net (shade netting).
Locate vine multiplication nursery beds near a reliable source of water and away from where a similar crop was planted in the previous season. An isolation distance of 100 m between the old sweet potato field and the nursery is recommended. If land is limited, surround the nursery site with a tall crop like maize to prevent movement of disease transferring insects from old field to the nursery.
Nursery beds are earthed up at least 20 cm above the surrounding ground level, 1.0 m wide and of convenient length to accommodate the anticipated planting material. Space between the beds is 0.5 – 1.0 m. Where different varieties are planted, 5 m distance should be left between the varieties.
The soil of the nursey beds should be tested on the nutrient composition before planting.
One debe (20 kg) of well-decomposed farmyard/poultry manure and 25-50 g of NPK (17:17:17), based on the soil test analysis, are applied per m2 of nursery bed.
Use mini stem cuttings of 3-4 nodes, where 2 nodes are inserted in the soil and 1 node above the ground. Water the material after planting, and regularly thereafter, preferably morning and evening. Keep the seedbeds weed-free and rogue any off types and infected plants.
Vines will be ready for harvesting 6-8 weeks after planting. Cuttings from young vines (2-3 months) will produce better than cuttings from older vines (4-6 months).
Harvested vines should be tied in bundles of 50 or 100 pieces. Ensure every package is well labelled showing variety, contact of the vine multiplier and date of harvest. The vines are put in gunny bags 1000 vines each and should be aerated most of the time. Transport planting materials immediately after harvesting. Untie and empty the bags once the destination is reached, to avoid accumulation of heat in the bags which can damage the vines
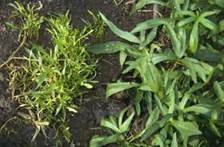
Conventional vine multiplication:
This is done on flat ground in an open field and near a source of water. Plant cuttings of 3-4 nodes or 20-30 cm long at 50 cm x 30 cm spacing. Plant cuttings vertically (buds facing up) with two thirds of the cutting inserted into the soil.
Plant management and vine harvesting are the same as for rapid multiplication.
Vine multiplication can be done through rapid vine multiplication on nursery beds, under rapid seed multiplication or through conventional vine multiplication on flat ground.
(vines or cuttings) should be obtained from accredited nurseries/ institutions (like JKUAT, KALRO) to ensure that they are clean (disease-free).
There are 3 types of sweet potato; white, yellow, and orange fleshed. The orange fleshed variety has higher nutritional value (mainly vitamin A).
There are a number of varieties for each type:
White fleshed; Mugande, SPK 013,
Yellow fleshed; Kenspot 1, Namnyekera, Cuny, Bungoma,
Orange fleshed; Kabode, Vitaa, Jankaroti, Kenspot 4, Kenspot 5.
(vines or cuttings) should be obtained from accredited nurseries/ institutions (like JKUAT, KALRO) to ensure that they are clean (disease-free).
Plant sweet potato on ridges or mounds/heaps, as a relay (intercrop) in cereals or as a monocrop. It can also be planted as a cover crop in orchards to reduce soil erosion.
Planting on ridges
Plant vines at an angle of 45 degrees, 30 cm apart, with vine ends (bases) towards the centre of the ridge, ⅔ into the soil, leaving ⅓ above the soil. Where ridges are wider than 1.0 m, double rows at 30 cm apart can be planted on top of the ridge.
Planting on mounds
Plant 3-4 vines of 20-30 cm length on each mound equidistantly in a triangular pattern on the sides of mound.
Plant population in both ridges and mounds should not be more than a 13,500 plants per acre. Too high plant population may result into many small tubers.
When rainfall is less than 500 mm over the growing season, or when the crop is planted later in the season, irrigation may be required. The aim is to keep the soil moisture conditions in the root zone as constant as possible. Inadequate moisture in the soil during root development retards root bulking.
Minimize nutrient leaching, run-off erosion, or water-logging by applying light irrigations.
Weeds compete with the crop for nutrients, water, light and space. Keep the field weed-free within the first two months after planting. Thereafter the vines will have spread to cover the soil and smother the weeds.
Sweet potato nutrient requirements include: N, P, K, Mg, Ca, Fe, B. Soil test/analysis is important before planting to detect nutrient deficiencies and establish the appropriate soil amendments needed. Application of too much nitrogen (N) leads to too much foliar growth and less growth of tubers.
Well-decomposed manure or compost can be added to the soil before planting to improve soil structure and fertility.
Gapping should be done within the first 2 weeks after planting.
Earthing up the roots controls the weeds and weevil attack, prevents greening of tubers and improves the physical and biological conditions of the soil.
(i)Sweet potato weevil
(ii)Sweet potato mites
(iii)Rodents
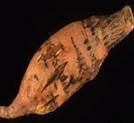
(i)Sweet potato weevil Cyclas spp
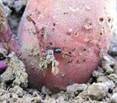
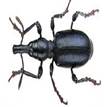
These are small black beetles. Adult weevils feed on the vines and tubers, while the larvae make tunnels into the vines and tubers.
Damaged tubers become unmarketable, bitter, with bad smell.
Control measures are:
(i)Earthing up the roots to minimize weevil damage.
(ii)Rotating sweet potato with other crops to reduce infestation.
(iii)Adopt Integrated pest mangement (IPM) measures that include; use clean planting material, field sanitation, avoiding old sweetpotato fields, planting on time and harvesting promptly.
Some farmers use pheromone traps and repelants
(ii)Sweet potato mites
Sweet potato vines react to mite infestation by forming hairiness condition referred to as “erinose” and die back during dry season.
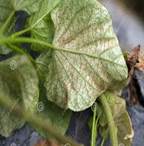

Sweet potato mites
Control measures
(i)Select mite-free planting materials
(ii)Plant in clean, mite-free fields.
(iii)Good field sanitation
(iv)Rotate after every season to break pest/disease cycle.
(v)Remove affected plants or clip the affected part of the vine and destroy/burn to reduce mite population.
(vi)Spray infected fields with miticides.
(iii)Rodents
Rodents often burrow near the roots and chew on the plant roots
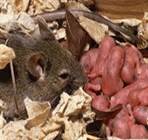
Sweet potato loss from rodents
Control measures
(i)Integrated pest management (IPM) is the best control option. For example, use of repellent materials inside their unblocked burrows e.g. cow dung mixed with chili or urine; destroying rodent burrow
(ii)Keeping the field and surrounding areas clean and clear of vegetation.
(iii)Digging a deep ditch around the perimeter of the field to prevent rodents from digging tunnels straight into the fields.
(iv)Use traditional traps.
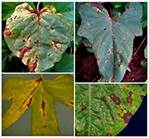
(i)Sweet potato Virus Disease (SPVD)
(ii)Alternaria Leaf Spot
(iii)Sweet Potato Feathery Mottle Virus (SPFMV) disease
Sweet potato Virus Disease (SPVD)
Is caused by a synergistic combination of Sweet Potato Feathery Mottle Virus (SPFMV) and Sweet Potato Sunken Vein Virus (SPSVV). SPVD is also spread by use of diseased planting materials
Symptoms: Stunted growth, small and narrow leaves with a distorted edge, wrinkling, vein-clearing, mottling, and the whole plant may appear yellowish.
Sweet potato Virus Disease (SPVD)
Control measures:
(i)Use resistant varieties, and disease free planting materials.
(ii)Practice crop rotation, and plant new fields away from old fields and uproot off-types.
(iii)Practice good field sanitation through regular weeding. (iv)Remove diseased plants to minimize disease spread.
Materials conserved in a fleece net will remain disease-free for at least one year depending on the management level.
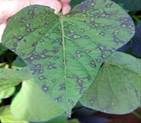
Alternaria Leaf Spot
Causal agent – Alternaria spp
Symptoms: Blackened lesions on the stems and leaves, become shrivelled, blackened, and die and fall off in severe cases.
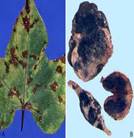
Control measures:
- Select resistant varieties
- Use healthy, clean disease-free planting materials
- Destroy or burn infected crop material
- Practice crop rotation
- Use fungicides for commercial vine production
Sweet Potato Feathery Mottle Virus (SPFMV) disease
Cause: the virus is transmitted by Aphids.
Symptoms: Feathery, purple pattern in the leaves; root necrosis and leaf chlorosis. Some strains cause root discoloration.
Sweet Potato Feathery Mottle Virus (SPFMV)
Control measures:
· Plant resistant varities.
Maturity indicators include:
(i)Yellowing and drying of the lower leaves and cracks forming on the soil surface of the ridge or mound.
(ii)Sap exuded from the cut surface of mature roots does not darken easily while the cut surface of immature storage roots gives a dark greyish colour.Cracks on the soil surface.
Piecemeal harvesting is the most common root removal practice and is done for specific needs; domestic, market, contractual arrangements. The practice should be done carefully not to damage remaining tubers.Cut off the vines 10-14 days prior to harvesting. This will induce pre-harvesting curing to reduce tuber skin damage at harvesting.
One-time harvest is done mainly in areas where sweet potato is commercialized.

If the crop is harvested too early, the roots will not be fully developed. Delayed harvesting on the other hand leads to fibrous and pest-infested roots.
Sweet potato will produce 35 – 95 bags per acre and 13,500 vines/acre.
Sweet potato is highly perishable once out of the ground and can be kept fresh for only 4 – 5 days after harvesting. Harvested tubers can be kept longer by using one of three storage methods:
In-ground storage: harvesting of what is required for current use and leaving the rest of the roots in the ground.
Check the field regularly for cracks or exposed roots and cover them with soil. This help to prevent root damage by weevils and exposure to the sun.
Clamp storage: make a flat mound of dry soil 1x1m wide raised about 10cm above the ground. Cover the mound with dry grass for cushioning the roots and moisture absorption. Iron sheets can also be used instead grass.
Carefully pile sorted roots on the mound in layers to form a pyramid then cover the roots with more dry grass and a layer of dry soil 10-20 cm thick.
Construct a grass roof above the mound to protect it from the sun or rain. Allow a gap between the roof and the mound for ventilation.
Dig a channel around the clamp to allow drainage of water from the roof. Remove roots from the pile as required ensuring that the pile is covered again with grass and soil.
Pit storage: dig a pit in a dry place. The size of the pit will depend on the quantity of roots to store.
Line the pit with dry grass. Prevent ants/termite’s moisture leakage to the stored roots and monitor to avoid root damage.
Pile the sweet potato roots in the hole and cover with more grass and dry soil.
Insert a bamboo pole or plastic pipe through the soil above the roots to act as a ventilation pipe.
Wash, sort, and grade the harvested roots, depending on the intended use.
Washing is to remove soil from the roots without bruising the skin.
Sorting is done to remove rotten, damaged, malformed and weevil infested roots, and debris.
Grading is done to categorise the sorted roots to have uniform produce, based on size, shape, colour, weight, maturity, market demand.
(a) baked, boiled, fried or mixed with other foods.
(b) cut and fried as crisps or chips.
(c) milling into flour which can be blended with other flours and used to make a wide variety of products such as bread, cakes, chapatis, etc.
Sweet potato is bulky and is substantially reduced when processed into flour or other post-harvest products. Key processing steps are:
• Washing of roots to remove soil or any other dirt.
• Peeling and Slicing
• Grating to reduce the size of chips.
• Drying (using sun or solar dryers)
• Milling into flour.
• Packaging & labelling before sale.