
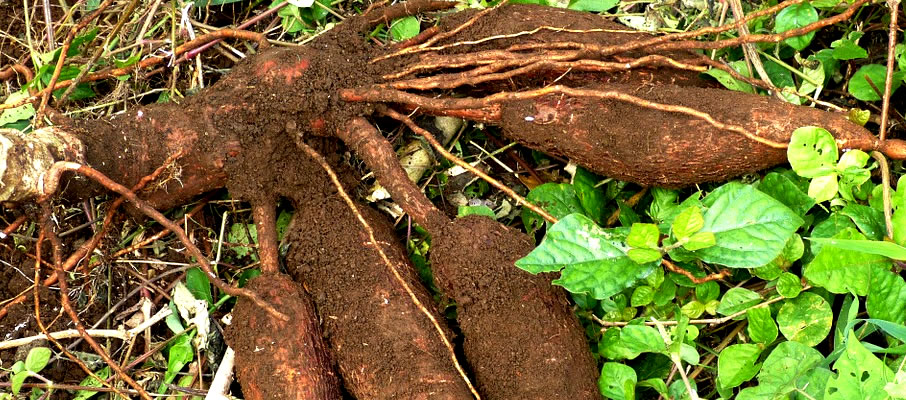
Cassava (Manihot esculenta) [Local names: Muhogo, Omuogo, Mariwa, Marieba] is drought tolerant and produces reasonable yields under adverse climatic conditions.
The crop can grow well and achieve good yields in areas where annual rainfall is as low as 500 mm, well-distributed in the growing season. Water-logged, compact soils or hard pan interferes with free root development.
The crop can remain in the soil as a famine reserve for a reasonable period of time after maturity. Other factors that make cassava popular with small-scale farmers are that it requires little labour in its production and there are no labour peaks because the necessary operations in its production can be spread throughout the year, and its yields fluctuate less than those of cereals.
History
Cassava will benefit from being grown after a legume crop or a leguminous cover crop.
Altitude range
Cassava can be grown at altitudes between 0 – 1500 m.a.s.l.
Soil type and conditions
Cassava requires deep, well-drained, light (sandy to sandy loam) soils for good root development. Medium fertile sandy loams with a pH of 4.5 – 6.5 are the most suitable.
Temperature range
The preferred day temperatures during the growing period should be 25 – 29 oC.
Rainfall
The rainfall should be 1000 – 1500 mm p.a., but the crop can grow well and achieve good yields in areas where annual rainfall is as low as 500 mm, provided it is well-distributed over the growing season.
Steps during land preparation
- Prepare land early, preferably 2 months before planting.
- Plough deep to allow for root establishment
- Harrow to a medium tilth
Prepare clean, disease-free planting materials from improved varieties of plants 6-8 months old.
For rapid multiplication, prepare mini-stem cuttings of 2-4 nodes in length.
Nursery practices
- Select a well-drained, flat site for the nursery bed, near a source of water.
- Prepare nursery beds of 1.0 – 1.2 m width, and at least 30 cm high, and of required length.
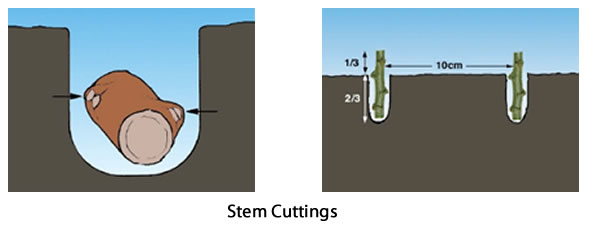
- Hardwood mini cuttings are planted horizontally, at a spacing of 10 cm x 10 cm, and at a depth of 4 cm to 5 cm. Place cuttings so that two adjacent nodes are on the right and left sides
- Semi-mature cuttings and tip-shoot cuttings are planted vertically at a spacing of 10 cm x 10 cm with two-thirds of the cuttings and the old ends buried in the soil. After planting the nursey beds should be watered regularly.
- For rapid seed multiplication, plant mini-stem cuttings in strong, perforated, black, disposable bags / containers filled with good quality garden soil; or soil-less media, following the same planting procedure as for nursery beds.
Recommended varieties
Migyera, MM96/9308, MM06/0074, MM06/0131, MM06/0013, MH95/0183, MM96/1642, MM98/3567, MM96/4271, MM96/2480, MM97/0293, MM96/0868, MM06/0138, MM06/0139
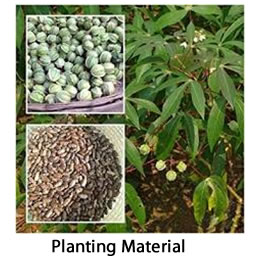
Common planting materials
Obtain planting materials from accredited nurseries/institutions like KALRO.
Common planting materials are:
- Seeds
- Mini-stem cuttings of 2-4 nodes, semi-mature cuttings, tip shoot mini-stem cuttings
Plant or transplant cuttings in a well-prepared field at a spacing of either 100 cm x 50 cm or 50 cm x 50 cm.
There are three different orientations in which cassava can be planted:
- Vertical or angled (slanting) orientation:- Plant the stakes at an angle of 45o–60o. Place ⅔ of the stake buried in the soil and ensure the buds are facing upwards.
- Horizontal planting (flat): - Burry the cutting 5 to 10cm horizontally so that the entire cutting lies beneath the soil. Flat position is done during dry season.
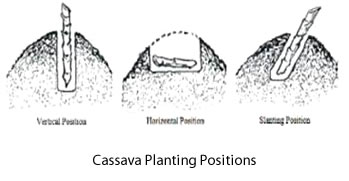
- Cuttings planted vertically at an angle sprout within 7-10 days while cuttings planted horizontally sprout within 14-21 days

Water the tip shoots lightly 3 times daily (Tip shoots are sensitive to low humidity). Keep the nursery beds weed free and cover the cuttings exposed during watering.
Weeding 3-5 times in the growing season may be sufficient. Remove the weeds around the plants by hand to avoid disturbing the roots and injuring the shoots.
When cassava is relay-cropped in cereals like maize, cassava cuttings should be planted after the final weeding of the prior crop.
Cassava nutrient requirements include: N, P, K, Ca, Mg, S, B, Cl, Cu, Fe, Mn, Mo and Zn. It is important to replenish phosphorus and potassium regularly.
Apply fertilizer to the ratooned fields.
Handle stems with care when harvesting, loading & transporting to avoid damaging the buds.
Tie the harvested stems together in bundles of 50 or 100 & package for sale in bags (1,000 cuttings/bag).
Harvesting of planting materials can start 6-8 months after transplanting. Cut the stems at a height of 20-25 cm above the ground. This Can be done up to three times. However, tip shoots can be cut several times in a year to serve as a source of seeds for a long period of time.
The cut stumps will sprout (ratoon) into several shoots, allow only 2-3 to grow.
Cassava can be intercropped with short crops such as grain legumes and pulses which mature in three months.
Intercropping ensures maximum land utilization since mean maturity period of cassava is 12 months.
Pests include:
(i)Cassava Green Mites (CGM),
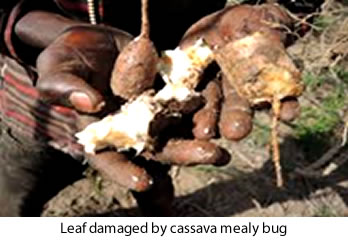
(ii)Cassava Mealy bugs,
(iii)Moles,
(iv)Livestock and wild game
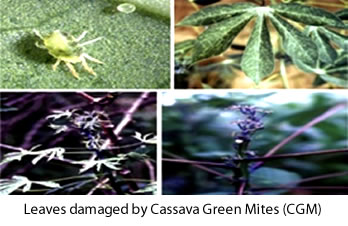
Control of Cassava Green Mites (CGM),
- Select CGM tolerant varieties
- Adjust planting time for the crop to escape severe damage at young stage.
- Biological control: several predatory mites such as aripo feeds on cassava green mites in some parts of western Kenya
- Rain drops also reduce CGM populations considerably
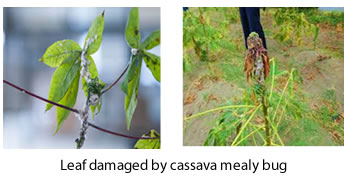
Control of mealy bug
- Plant resistant/tolerant varieties
- Apply Indigenous technical knowledge (ITK) g. trapping, keeping fields clean
- Diversify: grow different varieties in the same field
- Biological Control using parasitic wasp (Epidinocarsis lopezi wasp)
- During heavy rains many mealy bugs are washed off their host, infestations are thus most serious during the dry season.
Control cassava roots damage by moles
- Crop rotation can minimize mole damage on roots.
- Indigenous technical knowledge (ITK) has been used successfully by some farmers
Livestock & Wild Game
Control livestock damage by fencing.
Major diseases include:
(i)Cassava Mosaic Disease (CMD) and
(ii)Cassava Brown Streak Disease (CBSD)
Cassava Mosaic Disease (CMD)
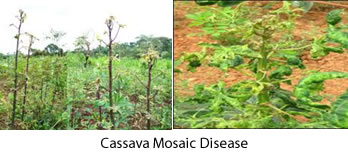
Management of cassava mosaic virus
- Plant resistant varieties/disease free materials
- Crop hygiene: Rogue infected plants
- Isolate new cassava fields from older diseased fields to minimize inoculum build-up
- Crop rotation
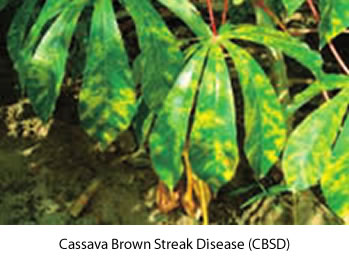
Management of Cassava Brown Streak Disease (CBSD)
- Resistant varieties/disease-free planting materials
- Harvest early, before symptoms reach at severity of 3 on grading scale of 1-5 in the roots.
- CBSD incidence is greatest at low altitude, and the disease has been observed at 1400 m. a.s.l.
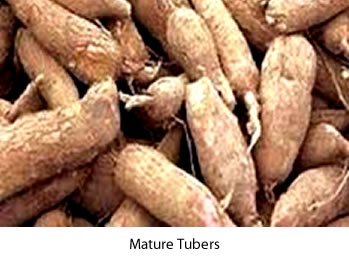
Cassava is ready for harvesting 9-12 months after planting depending on variety, and the stage of maturity is judged by the yellowing of lower leaves
- Harvesting is commonly done manually by uprooting the whole plant or piece-meal harvesting using a fork jembe/ hoe.
- Cassava can also be harvested mechanically, and the roots picked by hand. Harvesting is easier during the wet season and when cassava is planted on ridges and in loose or sandy soils.
- Too early harvesting results in lower root yield and starch content while delayed harvesting leads to development of woody, fibrous roots and reduction in starch content.
- Tubers may be consumed fresh, dried or cooked. Dry tubers can be processed into flour which can be used as pure flour or mixed with flour from cereals to make preparations such as bread, chapatis, cakes,cookies,etc.
Damaged and small roots should be processed first in order to minimize the growth of moulds.